5. Python and Jupyter Notebooks (svante-ood.mit.edu)
5.1. Running Python on Svante
Running Python on a high-performance computing cluster such as Svante is not as straightforward
as most other software. For other software on Svante, the system administators manage, install, upgrade, etc.
software on the cluster. Users are only permitted write access in their personal spaces, and thus cannot install
software for general usage (nor is users’ /home intended, nor sufficiently large, for software installations).
The core Python language itself is rather limited in its scientific capabilities, but a rapidly expanding library
of available packages is available to augment Python’s features; this set of packages is intended to be personalized and managed
by the user, with added packages stored in the users’ personal directory spaces.
On Svante we have two different installations of Python: Anaconda
(similar to what you might have on your laptop, without the Anaconda-Navigator GUI however),
e.g., module load anaconda3/2020.11 (which includes python 3.8.5;
newer conda installations are also available, which include newer python versions, to check load the module and
type python -V), and a traditional “system” Python installation, e.g., module load python
(we have several versions available as shown via module avail with current default python/3.9.1).
Anaconda is an open-source package management system and environment management system.
While we recommend using the system-based installation for script-based build/run environments
such as those which support models like CESM, for data analysis we STRONGLY recommend using Anaconda for python.
Python code can can be run interactively in a terminal window (or, simply passed a script for execution through a terminal window), or run interactively
in a Jupyter Notebook browser window (see Section 5.2); note only Anaconda-based python versions
can be used in Jupyter notebooks.
5.1.1. Terminal-window based Python with pre-installed packages
Both installations of Python on Svante (i.e., module anaconda3 or python) include a large collection of pre-installed packages,
ready for use with a import command. For example:
[jscience2@svante-login ~]$ ssh fs02
Last login: Fri Aug 20 15:25:23 2021 from 172.16.0.101
[jscience2@fs02 ~]$ module load anacondas3/2020.11
[jscience2@fs02 ~]$ which python
/home/software/anaconda3/2020.11/bin/python
[jscience2@fs02 ~]$ python -V
Python 3.8.5
[jscience2@fs02 ~]$ python
Python 3.8.5 (default, Sep  4 2020, 07:30:14)
[GCC 7.3.0] :: Anaconda, Inc. on linux
Type "help", "copyright", "credits" or "license" for more information.
>>> import numpy as np
>>> np.zeros((3, 4))
array([[0., 0., 0., 0.],
       [0., 0., 0., 0.],
       [0., 0., 0., 0.]])
>>>
In the example above, we first ssh to a fileserver (here, server fs02),
load up an Anaconda module, start up the Python session (alternatively, start the session by typing
ipython to get an interactive
Python shell), and import package numpy.
Alternatively, we could have requested an interactive compute node for our session, using
a slurm srun request (see Section 4.5). DO NOT run Python on svante-login.
If you have some Python code you want to execute non-interactively, you could write a slurm script, e.g.,
#!/bin/bash
#
#SBATCH -J example_py_script
#SBATCH –n 1
#SBATCH –p fdr
#SBATCH –t 2:00:00

source /etc/profile.d/modules.sh
module load anaconda3/2020.11

python «name of python script»
5.1.2. Installing new packages in Python
5.1.2.1. Adding packages to Python modules
If you want to add a common package to one of our Anaconda or Python modules, and/or you think others on Svante might benefit from having a new package widely available, the easiest approach is simply to ask us (at svante-admin@mit.edu) to add it to Svante’s software library (as noted above). Occasionally however there are conflicts with other packages already installed in our Anaconda or Python modules, and we will instead suggest you create a user-installed virtual environment.
5.1.2.2. Using Conda w/package manager to create virtual environments
Using our installed anaconda module to run Python, you can user-install
packages into your /home space only through a virtual environment:
module add anaconda3/2020.11
conda create -n «environment name»
source activate «environment name»
conda install jupyterlab
conda install «package name(s)»
conda deactivate
NOTE: When you create the virtual environment above, the terminal window instructions state the command to activate the environment
is conda activate «environment name». This will not work on svante, because you should never have done a conda init initialization,
which effectively interferes with our module environment system. Note it is necessary in the above steps to install the jupyterlab
package into your virtual environment if you want to use ipython or Svante Open OnDemand (https://svante-ood.mit.edu).
Also note, steps above are only supported using bash, not legacy C shell environments.
5.1.2.3. Debugging complex virtual environment installations
Increasingly, we have users wanting to install complex python-based data analysis frameworks to run on Svante. Creating a complicated virtual environment with many package dependencies is often not straightforward, for various reasons. It is not uncommon to involve us for help with such installations; don’t hesitate to reach out to svante-admin@mit.edu.
If you want to test a conda package installation you can clone your environment and test the installation there:
conda create -n «name of test environment» --clone ~/.conda/envs/«good environment name»
conda activate «name of test environment»
conda install «name of package to test»
and if things work out, you can install the module in your “good environment” without worries. You can then clean up/remove the test environment:
conda deactivate
conda remove -n «name of test environment» --all
5.2. Running Jupyter Notebooks using Svante Open OnDemand

Svante Open OnDemand (https://svante-ood.mit.edu) is a web-based interface to the Svante cluster. In addition to allowing simple tasks such as file browsing and opening a terminal window, its main feature allows the user to interactively run Python in a Jupyter Notebook (we will consider adding other Jupyter-supported applications to its capabilities, email with requests). Note: svante-ood only works with Anaconda-installed versions of Python.
Only Chrome and Firefox browsers are supported at this time (i.e., Safari does not work with svante-ood).
The functions of the menu pull-down tabs are as follows:
Files: from here you can list directories, with view, edit, and download functionality. Note by default, your /home
directory is selected, but from there you can navigate to any of your /home subdirectories. And, we have created soft-links
to all users’ file servers spaces (if you are missing access to any your file server spaces, please let us know).
Jobs: similar to the SLURM squeue -u command, this will list all your current SLURM jobs in the queue (both running and queued jobs).
In addition, this list of active jobs includes svante-ood jobs running on file servers.
Clusters: this tab opens a svante-login terminal window shell in your browser.
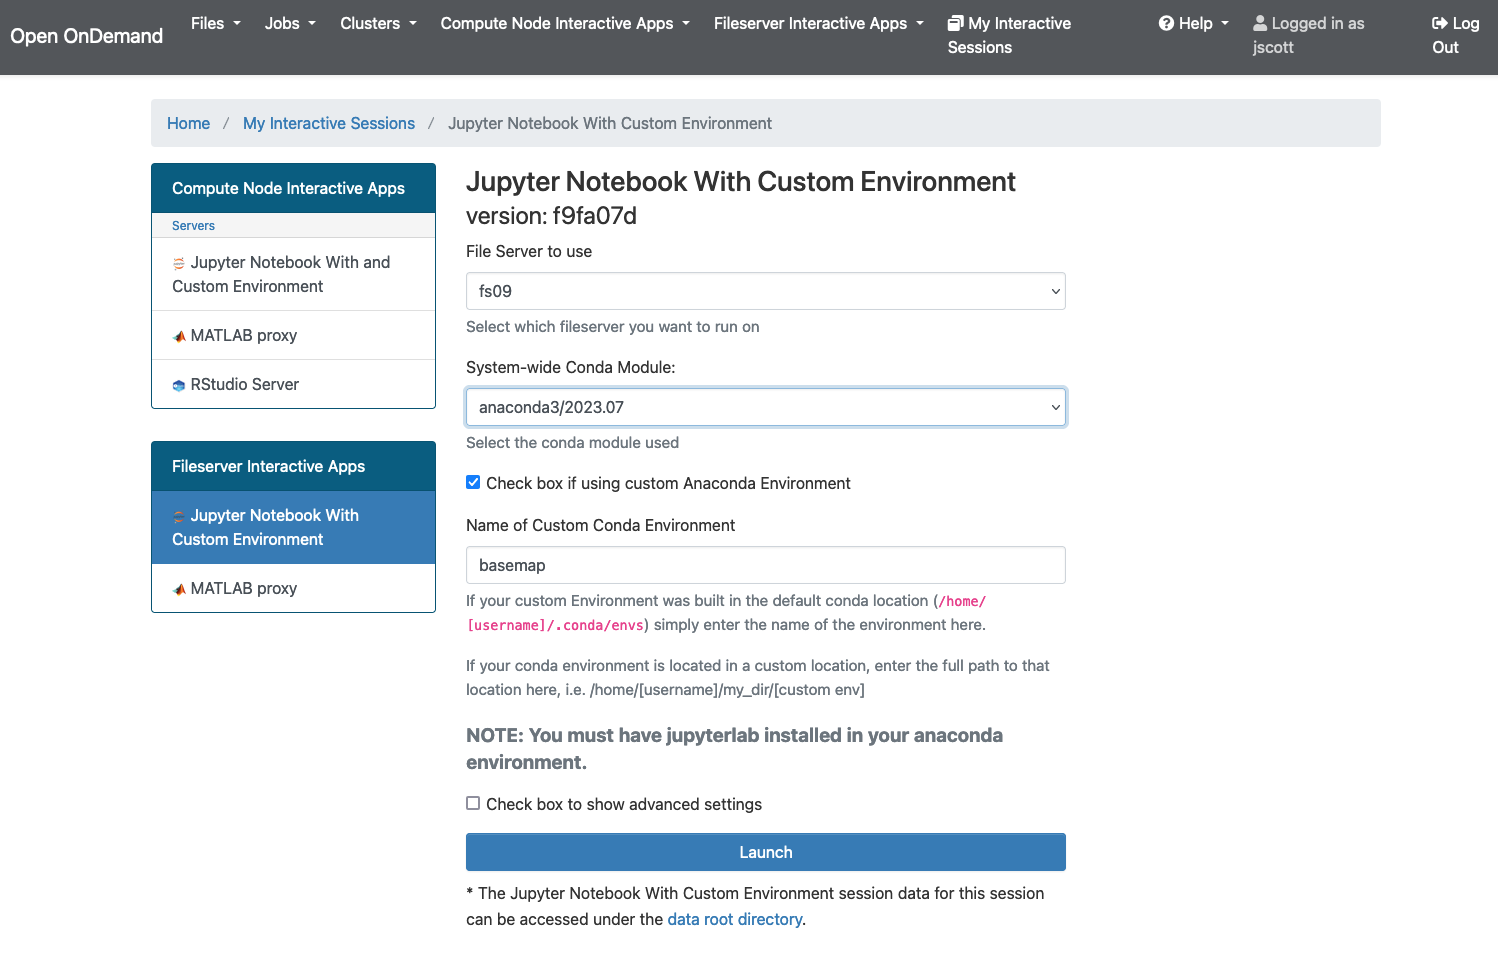
Compute Node Interactive Apps (Jupyter Notebook):

By filling in this page, SLURM is used to allocate compute node cores for running a Jupyter Notebook. You must specify your intended use time (i.e., this this SLURM’s walltime), and select which partition. Note this requests 50% of the compute node’s resources (12 cores/64GB for abba_ood, 8 cores/32GB RAM for FDR, 16/64GB for EDR), unless you check “Use full node”. In general we prefer you request abba_ood or FDR unless you specifically need the additional processor cores available on EDR nodes. Note that abba_ood nodes are exclusively reserved for OOD jobs, thus very likely there will be a free node available immediately. We have no plans to run OOD on HDR nodes at this time.
Next, specify which version of Anaconda to use; the choices available are all installed modules on the Svante cluster. Do pay attention to your choice; pre-installed packages are different in different modules (e.g., the anaconda3/2020.11_geoschem has multiple packages installed to aid in the analysis of GEOS-chem output). Moreover, if you have installed custom packages into your personal conda space, you need to know into which Anaconda module these packages were installed.
Finally, there are two additional check boxes at the bottom which expand when checked, as shown below:
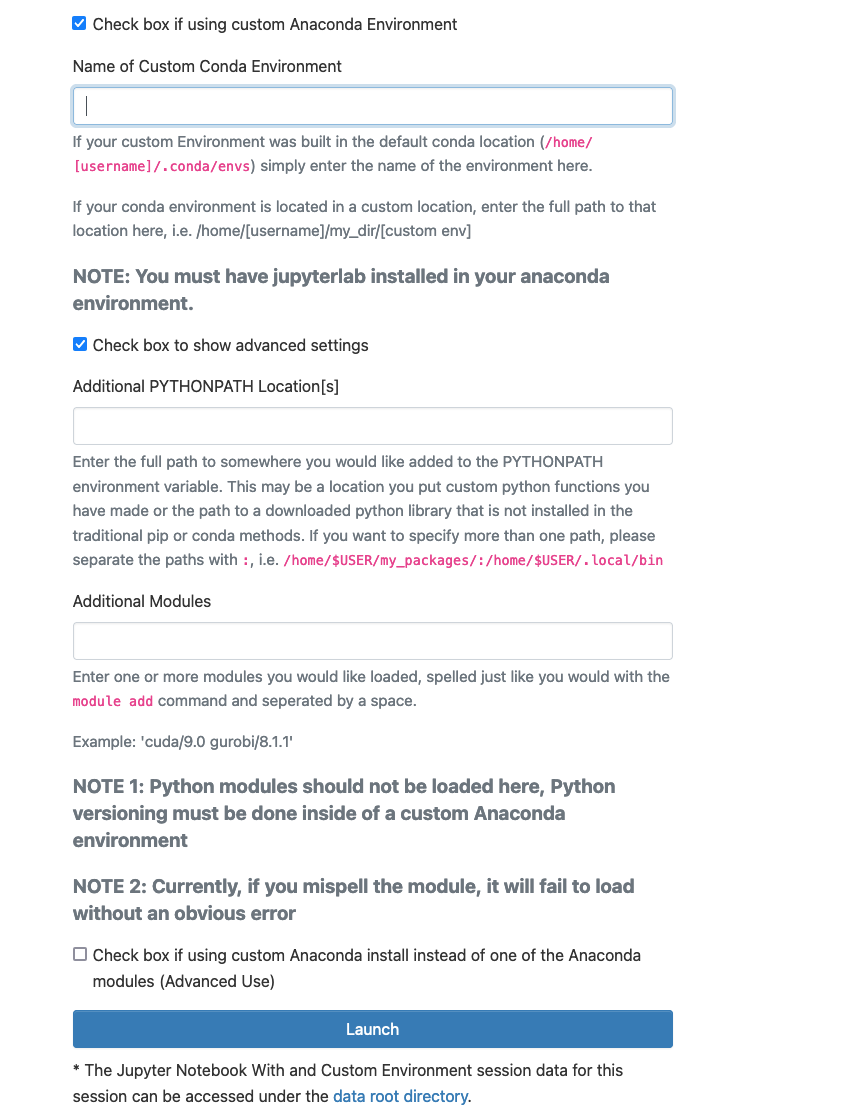
The first checkbox allows one to specify a “custom Anaconda Environment”,
or more commonly referred to as a virtual environment in Python. Enter the name of the custom environment in the box.
No path is required if you have created this environment in your /home space (which is done by default) but if located elsewhere,
specify the full path.
The second check box unlocks additional advanced features. The first box allows the user to add additional paths to
their unix environment variable PYTHONPATH; this could be used to include additional Python functions or libraries in the OOD session
(note, one can also augment PYTHONPATH in .bashrc, see below). The second box allows the user to load Svante modules into OOD.
This would be useful if say your python code relies on other installed Svante module libraries, e.g., ESMF. At the bottom is
a final check box for “custom Anaconda install”, which allows users to use their own Anaconda installation (i.e., full installation,
not just downloaded packages). When checked, this asks for the path to the user-installed Anaconda directory. In general we do not
recommend going this route unless you are very tech-savy, as we would rather help you debug problems using our standard anaconda installations.
When the top of the page is filled to satisfaction, hit the blue Lauch button at the bottom…
this will bring you to the My Interactive Sessions tab. Hit Connect to Jupyter: this directs you to a launcher
page where you can start up a Python 3 Jupyter Notebook (most typically, this is why you are using svante-ood!),
a Python 3 console window, or any of the other options at the bottom.
The directory path in the left column is pointing at your /home space (similar to the Files tab).
If you have a library of Python routines you want to be accessible to your Python session, there is an easy way
to do this: in your .bashrc file, include a line:
export PYTHONPATH=${PYTHONPATH}:«python code library directory»
Note this line should be included in a bash startup file, even if your user login default is C shell.
Compute Node Interactive Apps (MATLAB Proxy):
Documentation forthcoming
Compute Node Interactive Apps (RStudio Server):
Documentation forthcoming
Fileserver Interactive Apps (Jupyter Notebook):
Why run a svante-ood session on a file server? One major advantages: no wall time limit. And, file server usage is not monitored by the SLURM scheduler, so file server nodes are always available for use, even if other tasks are running concurrently. Moreover, if you are doing analysis involving heavy file input/output, your script will likely run much faster if the data are accessed locally, in other words running Python on the file server where the data are located (see Section 6.1.2). Typically, file servers are shared among research groups, so if you do monopolize a file server’s resources such as cores or RAM, your colleague in the office next door will be the one most likely to complain. That being said, when running a file server svante-ood session, there is a greater onus that you compute responsibily and/or check with your group members before fully taxing one of the servers. See Table 2.1 for a list of file servers and their resource specifications. Note also there is no restriction in using specific file servers even if you lack storage space there, but if you do plan to use significant resources, best to check with svante-admin@mit.edu beforehand.
After selecting the Fileserver Interactive Apps tab, the options and checkboxes are similar to those on the Compute Node Interactive Apps tab (which Anaconda module. custom Anaconda environments, PYTHONPATH, Anaconda module selection, and custom Anaconda installation), except for a pulldown menu at the top requiring the user to choose which file server to use. The blue Launch button will start up the session and pull up the My Interactive Sessions tab. As above, bring up the Notebook splash screen by hitting the Connect to Jupyter button.
My Interactive Sessions:
As noted above, this tab is automatically pulled up when you hit Connect to Jupyter or can be selected from the general svante-ood menu. All running svante-ood sessions for a user are listed, with option to delete any session. By clicking the Session ID link, a list of session-related files is pulled up; for debugging purposes, view these files to search for additional information on problems that might have occurred.
Log Out:
To completely log out of svante-ood, note that clicking the Log Out tab is insufficient; you must also completely quit the browser.